- Get link
- X
- Other Apps
Forms and the Input tag
Forms are an important element of websites as they allow data submission from the client to the server. You encounter forms on contact pages, Google forms, or inquiry forms. Details like date, time, and ticket information for flights and railways are also submitted through HTML forms.
In this blog, we will learn about forms, input tags, and best practices. Let's begin!
Setting Up the Environment
First, create a new folder named "Video 6" and open it with your preferred code editor. Inside the folder, create a file named "index.html".
To enable live preview, click on the gear icon below and select "Settings". In the settings menu, type "live preview" and choose the option that opens the preview in an external browser. This allows you to see the changes side by side as you work on your HTML and CSS designs.
Understanding Forms
A form is like a railway form or an exam form that you fill out to submit your data. In HTML, the form is represented by the <form> tag. When you write <form> and hit enter, you will be asked about the form's action, whether it should be a GET or POST request.
The action attribute determines how the form data will be sent to the server. A GET request is simple and used when you only need to tell the server something. A POST request is used when you need to send a larger amount of data, such as when submitting a form.
For example, you can set the form action to action="post".
Input Tags
The input tag is used to define different elements within a form, such as text fields, checkboxes, or radio buttons. To label an input, we use the <label> tag.
For example, the simplest input tag is <input type="text">. You can add attributes like name, placeholder, and id to specify the purpose and unique identifier of the input.
Here's an example:
<label for="username">Enter your username:</label><input type="text" name="username" id="username" placeholder="Enter your username">In this example, the label "Enter your username" is associated with the input field using the for attribute. The input field has a unique identifier of "username" using the id attribute.
Adding More Input Elements
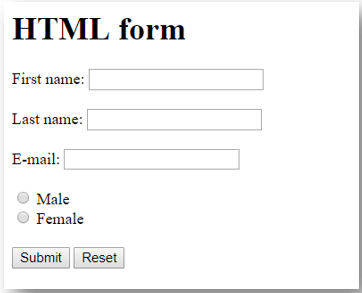
You can add more input elements to your form, such as asking for the user's gender or expertise. Simply add new <label> and <input> tags for each element.
<label for="gender">Enter your gender:</label><input type="text" name="gender" id="gender" placeholder="Enter your gender">What is it? Now, sometimes we wrap it in a div. A div is a block element. Inline and block elements will be explained in future videos, so for now, just understand that I'm putting it in a div to give it a new space.
Instead of using the br tag for line breaks, we will avoid using it to prevent bloating our HTML. The reason for this will be explained in future videos.
As you can see, when I click on "Female", the radio button is selected. The label for this radio button has the id "female", and both radio buttons have the same name "gender". This means that only one of the two can be selected at a time.
If I mess up the id in the label and form, the second radio button will not be selected. So it's important to always put the id of the input tag.
After the radio buttons, there is an input tag with type "checkbox". The difference between radio buttons and checkboxes is that checkboxes can be checked separately.
Next, we have the textarea and select tags. The textarea tag allows users to enter comments. The select tag provides options for the user to choose from.
I recommend keeping the textarea empty and using a label instead. You can style it with CSS later.
The select tag has options inside it, such as "Apple", "Banana", and "Cherry". The value attribute specifies the value that will be sent to the server when the form is submitted.
There are still many things to learn about forms, such as the action and method attributes. The action attribute specifies the page where the form data will be handled. The method attribute specifies whether the form data will be sent using a GET or POST request.
The name attribute is used to identify the input field when the form data is sent to the server. The placeholder attribute specifies the text that will be displayed inside the input field.

Comments
Post a Comment